
Interior Waterproofing

Step 1: Detecting the Damp Enemy
Before waging war, you need intel. This means a thorough inspection. Look for telltale signs like:
Damp or stained walls and floors
Cracks in the foundation
Musty odors
Mold growth
Puddles or standing water
Once the enemy is identified, it's time to strategize.
Step 2: Building Your Defense Lines
The Drainage Trench:
Imagine a moat protecting your castle walls. A perimeter drain acts as this first line of defense. A trench is dug along the foundation wall, a perforated pipe installed, and the trench filled with gravel. This clever system intercepts water seeping through the walls, directing it to a sump pump for expulsion.
Sealing the Breach:
Think of cracks as the enemy's sneaky entry points. Crack sealing involves widening, cleaning, and filling these cracks with special sealants, effectively plugging the leaks and preventing further water infiltration.
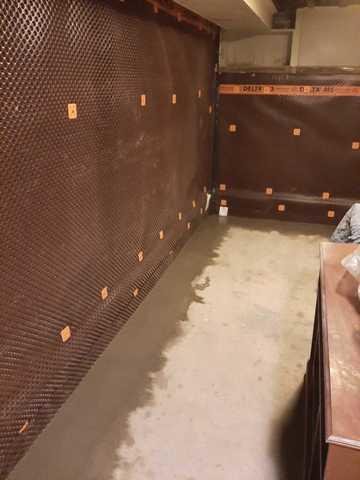
The Moisture Shield:
Now, fortifying the walls. We fasten dimple-board to the interior wall from about halfway up the wall down to the drainage trench before we seal it with concrete. The dimple board provides a watertight seal around your basement but it also allows any water that may have made its way through foundational cracks to seep right into the tile drain! Waterproofing without a dimple board is like swimming with a full winter suit on, you can do it, but its dangerous and doesn’t make any sense.
The Water Evacuation Squad:
Meet the hero of the battlefield: the sump pump. This tireless warrior pumps the collected water from the drainage system out of the building, ensuring it doesn't linger and cause further damage. Think of it as a tireless bucket brigade, keeping your basement dry.
Step 3: Controlling the Climate:
Moisture isn't just about leaks; it can also build up from everyday activities. This is where ventilation comes in. Exhaust fans and dehumidifiers join the fight, circulating air and removing excess moisture, creating a drier and healthier environment. Think of them as air purifiers keeping the dampness at bay.
Step 4: Maintaining the Peace Treaty:
Like any good defense, maintenance is key. Regularly check your sump pump, clean gutters, and ensure proper drainage to prevent future moisture build-up. Remember, vigilance is your friend in the fight against dampness.
Benefits of Interior Waterproofing:
A dry, healthy basement: No more musty odors, mold growth, or damp belongings. Enjoy a comfortable and healthy space for storage, recreation, or even a home theater!
Increased structural integrity: Dampness can weaken foundation walls. By waterproofing, you protect the core of your home, preventing costly repairs and structural damage.
Peace of mind: Knowing your basement is protected from moisture worries brings invaluable peace of mind. Focus on enjoying your home, not battling dampness.
Beyond the Basics: Disclaimers
Mold Control: In cases of existing mold growth, professional mold remediation is crucial before waterproofing. Removing and preventing mold is essential for health and safety.
Wet Basement Fixes: If your basement suffers from flooding or heavy water intrusion, additional measures like exterior drainage improvements or French drains might be necessary.
So, there you have it! From identifying the enemy to building your defenses and maintaining the peace, this comprehensive guide equips you to conquer dampness and transform your basement into a dry, healthy, and valuable space. Remember, with the right knowledge and tools, you can turn the tide on moisture and reclaim your basement's full potential!
Contact us
If you have any questions or comments, please contact us via email or phone, or send us a message using the contact form.
Email
INFO@Kawarthadrainscape.ca
Phone
705-868-1629
